Fresh Milled Sourdough Sandwich Bread
There’s nothing quite like the smell of fresh milled sourdough sandwich bread baking in the kitchen—and this easy, wholesome recipe is sure to become a family favorite. Made with fresh milled flour, it’s a breeze to throw together, especially during those busy summer days when you need a reliable go-to for the kids. With a rich flavor and soft texture, these loaves are perfect for sandwiches, toast, or just snacking straight from the cutting board.
Trust me—once you try it, you’ll be making it on repeat. Let’s get into it!

Sandwich Bread vs Round Loaves
A common complaint I hear from people about the traditional crusty sourdough boule (round loaf) is that they miss the softness of a classic sandwich loaf. If that’s you, this sourdough sandwich bread is exactly what you’ve been craving. If that’s not you, check out my Sourdough Boule recipe here, or a Fresh Milled Sourdough Boule recipe here.
Not only is this recipe absolutely delicious, but it’s also incredibly simple. There are no strange ingredients, no constant folding and stretching. Just mix, let it rise, shape, rise again, and bake. You’ll never go back to store bought bread after trying this.
Once it’s cooled, slice into that soft, pillowy loaf and slather it with butter, or homemade jam. It’s so good, you might think it came straight from a restaurant breadboard. But let’s be honest, it’s even better because it’s made from scratch and has that perfect sourdough tang.
This recipe is for 2 loaves. I often double or triple recipes. These sandwich bread loaves freeze very nicely! To freeze them, I wait until the loaves cool and slice them up, put the slices in a ziplock bag, and freeze!

Ingredients
- 920-950g fresh milled flour (≈ 5 ¼ cups) a hard white wheat is great here,
but I like to get creative and use a blend of:- 800g hard white wheat
- 120g hard red wheat, rye, or Kamut
- 750g water, room temperature (≈ 2 cups + 1 tbsp)
- 60g melted butter or olive oil (≈ ¼ cup)
- 40g sugar (≈ 3 tbsp) or 66g honey (≈ 4 tbsp)
- 15g sea salt (≈ 2 tsp)
- 1 large egg, room temperature
- 150g active sourdough starter (≈ ¾ cup)
- 1 egg (optional, for egg wash)

Instructions
1. Prepare Your Starter:
The night before, make sure to feed your sourdough starter so it’s bubbly and active by morning. If you need more help determining the stages of your starter, read this blog post.
2. Mill Your flour:
In the morning, mill your flour. I typically use a hard white wheat, with a little Kamut (Khorasan wheat) mixed in. You can use hard red wheat or rye as well. The key is to use hard wheat to ensure proper gluten development for a well-risen loaf. I order all of my organic grains in bulk, from Azure Standard. You can shop Azure here.
3. Autolyse:
In a stand mixer, combine the water (750g) and freshly milled flour (920-950g). I love my Nutrimill mixer linked here. Mix slowly until all the dry flour is hydrated. Cover and let the dough rest for 30 minutes to 1 hour. This rest allows the flour to absorb the water fully and gives the bran time to soften. This step is called the autolyse.
4. Add Remaining Ingredients:
After the autolyse, add the melted butter, or oil (60g), sugar, or honey (40g or 66g), salt (15g), sourdough starter (150g), and the egg. Mix all ingredients until well combined.
5. Knead the Dough:
Begin kneading the dough. I use setting 2 on my Bosch mixer. This may take anywhere from 5 to 25 minutes depending on your mixer and flour type. The dough should become stretchy and cohesive. It should be able to pass the windowpane test. See picture below for what that looks like.
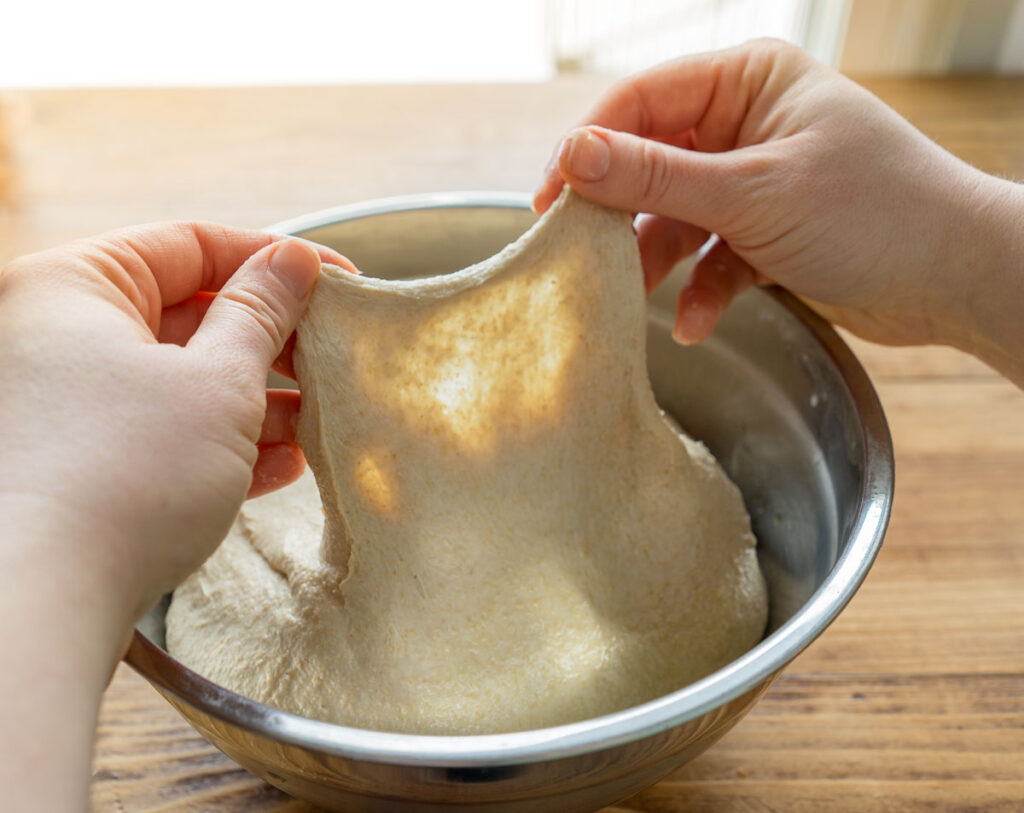
It’s a wet dough—try to avoid adding extra flour. Check for a strong, elastic texture.
6. Bulk Ferment:
Cover the dough and let it rise until doubled in size. This can take anywhere from 2 to 8 hours depending on your starter, and kitchen temperature. My dough takes 2-4 hours to double in the warmer months, but longer in the winter months. Make sure to watch your dough, more than the clock.
More Instructions (The Fun Part)

7. Shape the Loaves:
Line two small bread pans with parchment paper, or oil them generously. I use these cast iron bread pans. Once the dough has doubled, turn it out onto a lightly oiled surface and divide it in half. This makes two small loaves. Gently stretch each half flat, then roll them into a log, building surface tension you can gently drag them across the counter to build some surface tension. The dough will be sticky—oil your hands and surface to make shaping easier.

8. Final Rise:
Place each shaped loaf into the prepared pan. Cover and let them rise again for 2–3 hours, or until visibly puffy.
Rise time varies, so check on your loaves periodically.

9. Preheat Oven:
Toward the end of the second rise, preheat your oven to 375°F (190°C).
10. Optional Egg Wash:
Once the loaves have risen and look puffy, you can brush the tops with an egg wash for a shiny, golden crust. This step is optional.
11. Bake:
Bake the loaves for 40–45 minutes, or until the internal temperature reaches 205–210°F (96–99°C).
If the temperature is below this range, the loaves may turn out gummy.
12. Cool on a Rack:
Once the loaves are done, remove them from the oven and lift them out of the pans using the parchment paper.
Place on a wire rack to cool completely. (The parchment acts as a handle to help avoid burns.)
13. Let Cool Before Slicing:
Allow the loaves to cool completely before slicing. Cutting too early may result in a gummy texture.
Once fully cooled, slice to your desired thickness and enjoy!

Tips for Successful Sourdough Baking:
- Adjusting Flour Amounts: Since sourdough starter hydration levels vary, you may need to adjust the amount of flour slightly. Start with the amount in the recipe, then add a little more if the dough is too sticky. This is a very wet dough, so try not to add too much more
- Softened Butter: Use very soft butter cut into small cubes, which makes it easier to incorporate into the dough.
- Watch Your Mixer Capacity: Depending on your stand mixer model, handling a double batch might be too much for the motor. If you have a standard KitchenAid, you may want to only make one loaf at a time, I use this mixer and it can handle multiple batches of dough with no issues, she’s a real workhorse.
- Avoid Over-Fermentation: Over-fermenting can turn your dough into a sticky mess that struggles to rise properly. If this happens, don’t worry! You can still repurpose it into sourdough croutons or breadcrumbs.
Serving Fresh Milled Sourdough Sandwich Bread
We love a warm, toasted slice of fresh milled sourdough sandwich bread slathered with butter, but here are some more ideas!
- Serve your fresh-milled sourdough sandwich bread at lunch. It’s a key part of the ultimate BLT. YUM!
- Toast it up, add some homemade strawberry jam, and serve with eggs for breakfast.
- Pack a picnic for the park with classic PB&Js.
Needing a little strawberry jam to take your toast to the next level? My strawberry jam recipe will be the star of the show. Grab the recipe here!

This recipe is a fantastic foundation for your sourdough baking journey. With a bit of practice, you’ll quickly become comfortable with the steps, and soon enough, you’ll be ready to try adding variations like seeds, herbs, or even whole grains. Enjoy the satisfying process of creating your own sourdough bread right at home, and savor each delicious bite!

Shop This Post


https://nutrimill.com/acresandaprons

https://amzn.to/3Z7mnbo

https://www.azurestandard.com/?a_aid=3a2cca7da4

Fresh-Milled Sourdough Sandwich Bread
Equipment
- 1 sourdough starter, active and bubbly
- 2 loaf pans
- 1 Mixing bowl
- 1 Stand mixer
- 1 Kitchen Scale
Ingredients
- 920-950 grams fresh milled flour use hard white wheat or a combination like me (800g hard white wheat, 120g hard red wheat, rye, or Kamut)
- 750 grams water, room temperature
- 60 grams melted butter (or olive oil)
- 40 grams sugar or 66 grams honey
- 15 grams sea salt
- 1 large egg, room temp
- 150 grams active sourdough starter
- 1 egg, optional (for egg wash)
Instructions
- Prepare Your Starter: The night before, make sure to feed your sourdough starter so it’s bubbly and active by morning.
- Mill your flour: In the morning, mill your flour. I typically use hard white wheat with a little Kamut (Khorasan wheat) mixed in. You can use hard red wheat or rye as well. The key is to use mostly hard wheat to ensure proper gluten development for a well-risen loaf.
- Autolyse: In a stand mixer, combine the water (750g) and freshly milled flour (920-950g). Mix slowly until all the dry flour is hydrated. Cover and let the dough rest for 30 minutes to 1 hour. This rest allows the flour to absorb the water fully and gives the bran time to soften. This step is called the autolyse.
- Add Remaining Ingredients: After the autolyse, add the melted butter or oil (60g), sugar or honey (40g or 66g), salt (15g), sourdough starter (150g), and the egg. Mix all ingredients until well combined.
- Knead the Dough: Begin kneading the dough. I use setting 2 on my Bosch Mixer. This may take anywhere from 5 to 25 minutes depending on your mixer and flour type. The dough should become stretchy and cohesive. It’s a wet dough, so try to avoid adding too much extra flour. Check for a strong, elastic texture that passes the windowpane test.
- Bulk Ferment: Cover the dough and let it rise until doubled in size. This can take anywhere from 2 to 8 hours depending on your starter and kitchen temperature. My dough takes 2-4 hours to double in the warmer months, but longer in the winter months. Make sure to watch your dough more than the clock.
- Shape the Loaves: Line two small bread pans with parchment paper. Once the dough has doubled, turn it out onto a lightly oiled surface and divide it in half. This makes two small 1-pound loaves. Gently stretch each half flat, then roll them into a log shape. You can gently pull them on the counter to build some surface tension. The dough will be sticky, oil your hands and surface to make shaping easier.
- Final Rise: Place each shaped loaf into a prepared pan. Cover and let rise again for 2–3 hours, or until visibly puffy. Rise time varies, so check on your loaves periodically.
- Preheat Oven: Toward the end of the second rise, preheat your oven to 375°F (190°C).
- Optional Egg Wash: Once the loaves have risen and look puffy, you can brush the tops with an egg wash for a shiny, golden crust. This step is optional.
- Bake: Bake the loaves for 40–45 minutes, or until the internal temperature reaches 205–210°F (96–99°C).If the temperature is below this range, the loaves may turn out gummy.
- Cool on a Rack: Once the loaves are done, remove them from the oven and lift them out of the pans using the parchment paper.Place on a wire rack to cool completely. (The parchment acts as a handle to help avoid burns.)
- Let Cool Before Slicing: Allow the loaves to cool completely before slicing. Cutting too early may result in a gummy texture.Once fully cooled, slice to your desired thickness and enjoy!
Notes
- Adjusting Flour Amounts: Since sourdough starter hydration levels vary, you may need to adjust the amount of flour slightly. Start with the amount in the recipe, then add a little more if the dough is too sticky.
- Softened Butter: Use very soft butter cut into small cubes, which makes it easier to incorporate into the dough.
- Watch Your Mixer Capacity: Depending on your stand mixer model, handling a double batch might be too much for the motor. If you have a standard KitchenAid, you may want to only make one loaf at a time, I use this mixer and it can handle multiple batches of dough with no issues, she’s a real workhorse.
- Avoid Over-Fermentation: Over-fermenting can turn your dough into a sticky mess that struggles to rise properly. If this happens, don’t worry! You can still repurpose it into sourdough croutons or breadcrumbs.
Get the scoop each week in our Acres and Aprons newsletter! It’s a round up of all of the latest happenings around the homestead, our favorite recipes and the best links and discount codes for products we love. Jump on the list here.


Would it be possible to hand knead this if you don’t have a mixer
Yes, you could hand knead this dough. Just knead on the counter until you pass the windowpane test, as detailed in the instructions!
How much time does it remain good to consume? Does it go bad fast?
It is best eaten within the first few days, but I slice mine and freeze it for up to a few months!
I’m wondering if this is supposed to say 620-650 grams of flour instead of 920-950. Is that correct?
Hi Rachel! 920-950 is the correct range for this recipe.
Yes, thank you! I figured this out while I was making it. I was just confused by the breakdown of 500 g hard white and 120 g other wheat. I see it was corrected so that’s great! The bread turned out so good so thank you for this recipe!!
We LOVE this bread! It’s a staple in our home.
I’m so happy to hear you love it!
Wonderful recipe! Have had success every time. So so tasty! Sliced and frozen keeps and reheats well.
So glad you loved it!
Turns out amazing every time